

Making something with your own hands, especially a personalized shirt, feels pretty special, doesn't it? There's a real joy in wearing something unique, a piece that shows off a bit of your personality. Learning ways to do tie dye heart shirts offers just that chance, giving you a fun, creative outlet and a wearable work of art. It’s a wonderful way to express affection, make a thoughtful gift, or simply enjoy a colorful activity.
This particular craft, creating a heart shape with tie-dye, has a charm all its own. It's more than just a shirt; it's a statement, a little piece of happiness you can wear. People really enjoy seeing these custom designs, and it's a project that brings smiles, whether you're making it for yourself or someone else, so it's a good thing to try.
Today, November 28, 2023, we'll walk through several approaches to achieve that lovely heart shape on fabric. We'll cover what you need to get started, different folding and dyeing methods, and how to care for your new creation. You'll find that making these shirts is quite straightforward, and the results are truly rewarding, you know?
Table of Contents
- Why Heart Tie-Dye is a Great Idea
- Getting Ready for Your Heart Tie-Dye Project
- Classic Folding Method for a Sharp Heart
- The Scrunch Method for a Soft Heart
- Ice Dyeing a Heart: A Cool Approach
- Stencil-Assisted Heart Designs
- Care and Keeping of Your New Heart Shirt
- Common Questions About Tie-Dye Hearts
Why Heart Tie-Dye is a Great Idea
There's something truly appealing about a tie-dye heart shirt. It mixes a classic, cheerful pattern with a symbol of love and kindness. This combination makes it a fantastic choice for many occasions, or just for everyday wear, you know?
These shirts are great for gifts, especially for friends or family. A handmade item always feels more thoughtful, and a heart design sends a warm message. They are also perfect for group activities, like parties or family gatherings, creating shared memories, too.
Beyond the sentiment, heart tie-dye lets you play with colors and patterns. Each shirt comes out a little different, making every piece genuinely one-of-a-kind. It's a fun way to get creative and see what cool designs you can come up with, really.
Getting Ready for Your Heart Tie-Dye Project
Before you jump into the dyeing process, getting everything ready makes the experience much smoother. A little preparation goes a long way to ensure your project is a success. This way, you can focus on the fun part, which is the dyeing itself, as a matter of fact.
What You'll Need
- Plain White Cotton Shirts: 100% cotton works best for absorbing dye and showing vibrant colors. Pre-wash them without fabric softener to remove any sizing that might block the dye.
- Tie-Dye Kit or Individual Dyes: Choose colors you love. Fiber reactive dyes are usually the best for bright, lasting results on cotton.
- Rubber Bands or String: Lots of them! These are what create your heart shape. Strong string, like kite string, can give a tighter bind, too.
- Plastic Squeeze Bottles: These are super helpful for applying dye precisely, helping you control where the colors go.
- Plastic Sheeting or Trash Bags: To protect your work surface from dye spills. You'll want a big area covered, typically.
- Gloves: Protect your hands from dye. Disposable gloves are fine, or reusable ones, naturally.
- Bucket or Tub: For soaking shirts in soda ash (if your kit doesn't have it mixed in).
- Measuring Tape or Ruler: Helpful for finding the center of your shirt and making even folds, sometimes.
- Permanent Marker or Fabric Marker: For drawing a light guide on your shirt, if you want.
- Plastic Wrap or Ziploc Bags: For letting your dyed shirts set.
- Access to Water: For rinsing the shirts after dyeing.
Safety First, You Know?
Working with dyes can be a bit messy, so it's good to take a few simple precautions. Always wear gloves to keep dye off your skin. Also, consider wearing old clothes that you don't mind getting stained, you know?
Work in a well-ventilated area, perhaps outdoors or near an open window. This helps with any dye fumes. Covering your workspace completely protects surfaces, which is pretty important for easy cleanup, obviously.
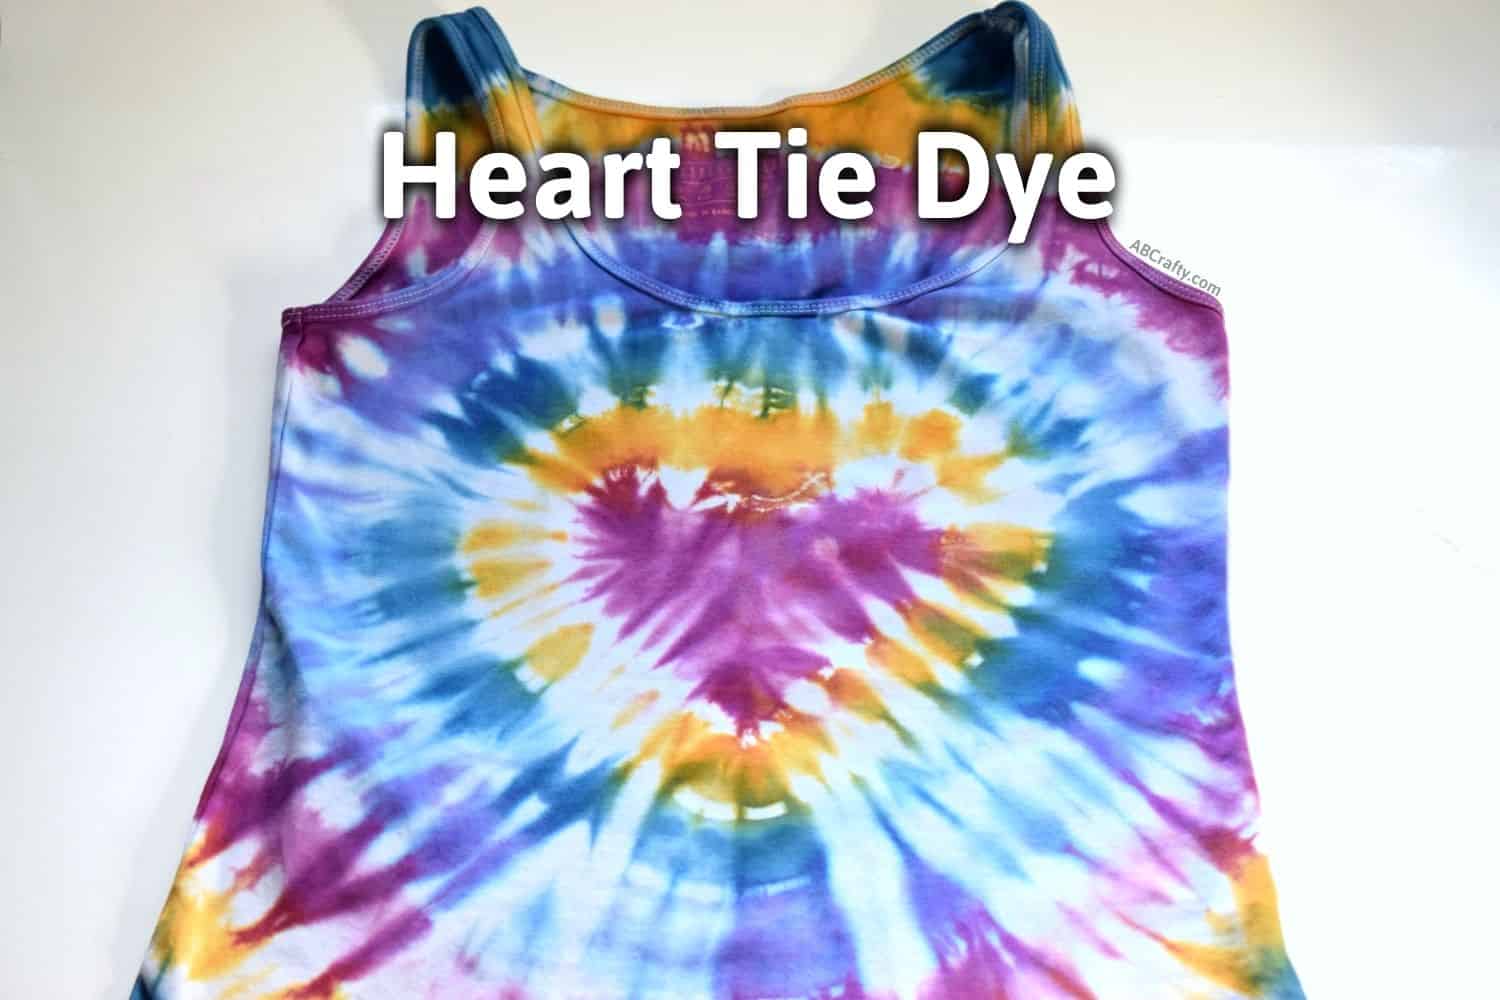
Classic Folding Method for a Sharp Heart
This method is probably the most popular for creating a clear, defined heart shape. It relies on careful folding and binding. It's a bit like following a map to get to a specific destination, you know, where every turn matters for the final result.
Step-by-Step Guide
- Prepare Your Shirt: Lay your pre-washed, damp shirt flat. Smooth out any wrinkles.
- Fold in Half: Fold the shirt lengthwise down the middle. This fold will be the center line of your heart.
- Draw Half a Heart: On one side of the folded shirt, use a washable marker to draw half of a heart shape. Make sure the straight edge of your half-heart lines up with the folded edge of the shirt. This line will guide your binding, so it's pretty important.
- Pinch and Gather: Carefully pinch the fabric along the drawn half-heart line. Slowly gather the fabric along this line, pulling it up into a small ridge.
- Bind the Heart: Once you have the ridge of fabric, start wrapping rubber bands or string tightly around it, following the shape of your drawn half-heart. Wrap tightly, making sure the fabric is really compressed. This creates a resist, keeping dye from reaching those areas, more or less.
- Add More Bands: For a sharper heart, you can add more rubber bands around the outside of the heart shape, creating sections for different colors. This helps define the edges even more, in a way.
- Apply Dye: Now, apply your dyes. The area inside your bound heart shape will be the heart itself, so you might want to use a different color there. The areas outside the heart can be other colors. Try to apply dye evenly, but not so much that it pools excessively, you know.
- Set the Dye: Place your dyed shirt in a plastic bag or wrap it in plastic wrap. Let it sit for at least 6-8 hours, or up to 24 hours for more vibrant colors. This setting time is pretty crucial for the dye to bond with the fabric, actually.
- Rinse and Wash: After setting, rinse the shirt under cold running water until the water runs clear. Then, wash it in a washing machine with a small amount of detergent on a cold cycle. Dry as usual.
Tips for a Clear Heart Shape
To get a really crisp heart, make sure your fabric is very tightly bound along the drawn line. The tighter the rubber bands or string, the less dye will bleed into the heart shape. This is a key part of getting a good result, typically.
Consider using a contrasting color for the heart itself and the background. For example, a red heart on a blue or purple background makes the heart really stand out. You could even leave the heart area white by not applying any dye to it, if you wanted, which is a nice touch.
Sometimes, getting a perfect shape takes a little practice. Don't worry if your first attempt isn't exactly as you pictured; that's part of the fun of tie-dye, you know? Each piece is unique, and that's the beauty of it, really.
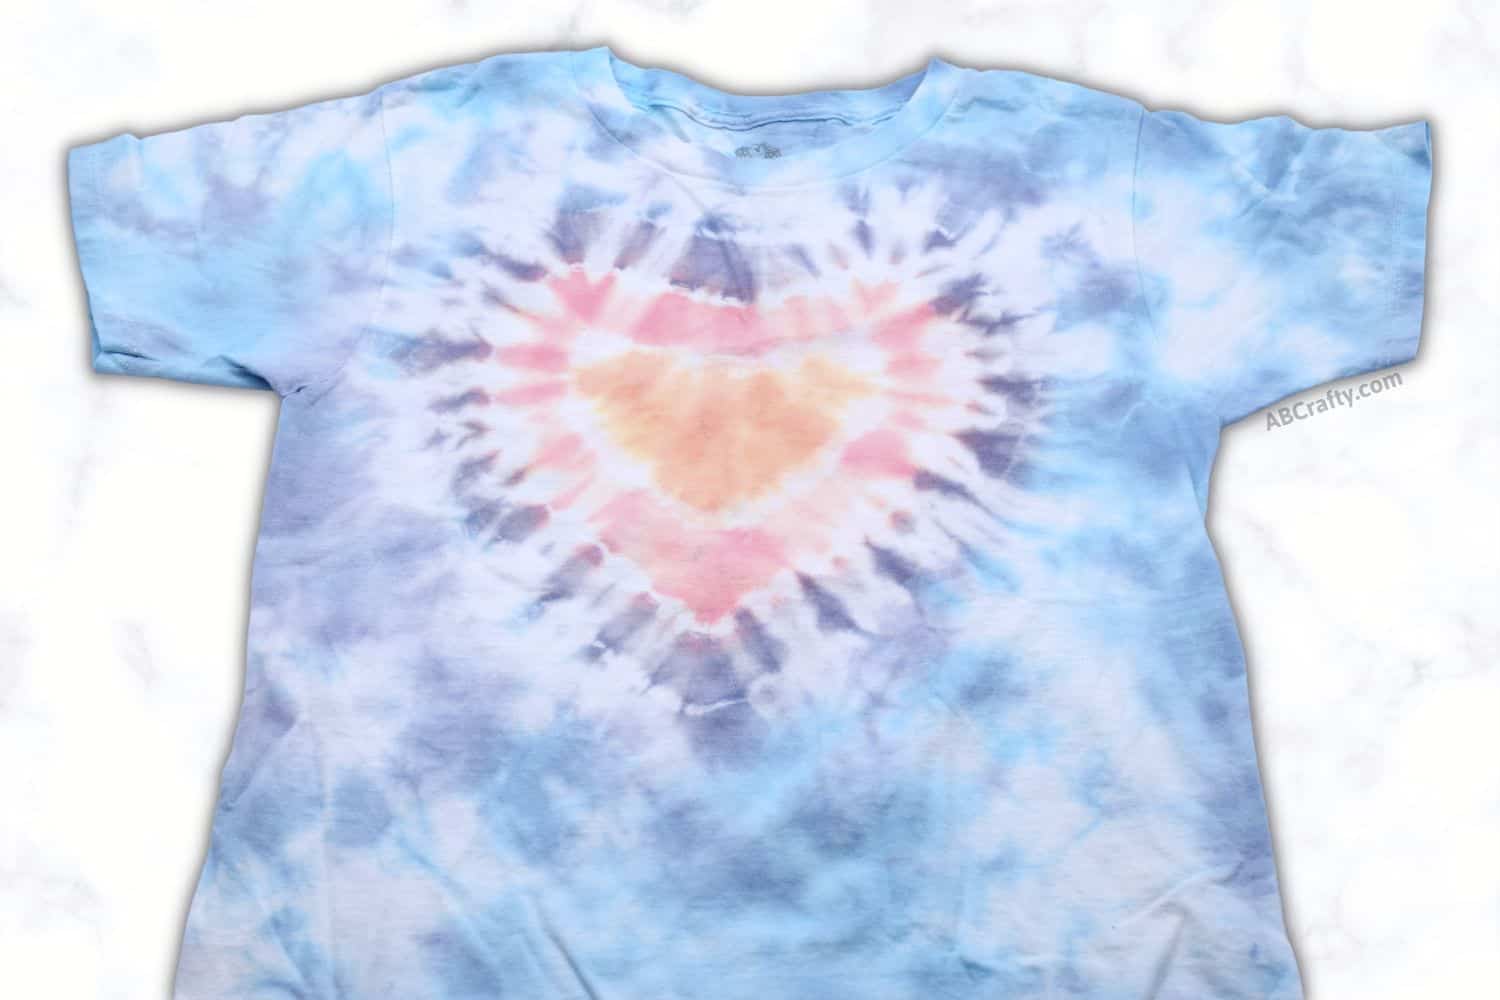
The Scrunch Method for a Soft Heart
If you prefer a softer, more organic-looking heart, the scrunch method might be just what you're looking for. This technique gives a less defined but still recognizable heart shape with beautiful, flowing colors. It's a bit more freeform, so you get some lovely surprises, too.
How to Make It Happen
- Prepare Your Shirt: Lay your damp, pre-washed shirt flat.
- Outline the Heart: Lightly draw a heart shape on your shirt with a washable marker. This will be your general guide.
- Scrunch the Heart Area: Starting from the center of your drawn heart, begin to gently scrunch the fabric inwards, following the outline of your heart. You're trying to create a relatively flat, heart-shaped mound of fabric.
- Bind the Mound: Once you have your heart-shaped mound, carefully place rubber bands around its perimeter to hold the scrunched shape. You might need several bands to keep it together. This binding doesn't have to be super tight, just enough to hold the shape, so.
- Apply Dye: Apply dye to the scrunched heart area. You can use one color or several, letting them blend. Then, apply different colors to the areas outside the heart. The dye will spread in interesting ways, creating soft edges, you know.
- Set and Rinse: As with the classic method, let the dye set for several hours in a plastic bag. Then, rinse thoroughly with cold water until the water runs clear, and machine wash.
Getting That Organic Look
The beauty of the scrunch method is its relaxed feel. Don't try to make the heart perfectly symmetrical; the slight imperfections add to its charm. You're aiming for a soft, watercolor-like effect, in some respects.
Using complementary colors that blend well together will enhance the soft look. Think about colors that naturally flow into one another, like blues and greens, or pinks and purples. This approach is pretty forgiving, which is nice, you know?
Ice Dyeing a Heart: A Cool Approach
Ice dyeing creates truly unique and unpredictable patterns, and you can apply this to a heart shape for stunning results. The melting ice slowly carries the dye through the fabric, creating beautiful speckles and color shifts. It's a bit of a slower process, but the outcome is often amazing, really.
Setting Up for Ice Dye
- Prepare Your Shirt: Lay your damp, pre-washed shirt flat.
- Fold or Scrunch Your Heart: You can use either the classic tight fold method or the scrunch method to create your heart shape. For ice dye, the tighter fold might give a more defined heart, while a scrunch will give a softer one. Bind it as usual.
- Elevate Your Shirt: Place your bound shirt on a wire rack over a bucket or tub. This allows the melting ice and excess dye to drip away, preventing muddy colors. This setup is pretty important for good results, you know.
- Cover with Ice: Generously cover the entire shirt, especially the heart area, with ice cubes. Make sure the ice is evenly distributed over the fabric.
- Sprinkle Dye Powder: Sprinkle powdered fiber reactive dye directly onto the ice. You can use one color or several, layering them for interesting effects. The dye will be carried by the melting ice, so a little goes a long way, more or less.
Watching the Colors Flow
As the ice melts, it will slowly dissolve the dye powder and carry the colors into the fabric. This process can take several hours, even overnight, depending on the room temperature. It's quite fascinating to watch the colors spread, apparently.
Once all the ice has melted, let the shirt sit for a few more hours to ensure the dye has fully bonded. Then, rinse and wash as you would with any other tie-dye project. The results are often very unique, with a lovely watercolor feel, too.
Stencil-Assisted Heart Designs
For those who want a super crisp heart or perhaps a heart with a specific pattern inside, using a stencil can be a great option. This method involves applying dye more directly to a specific area. It's a bit like precision work, you know, getting everything just right.
Preparing Your Stencil
- Choose or Create a Stencil: You can buy a heart stencil or make one from thick plastic or cardboard. Make sure it's large enough for your shirt.
- Secure the Shirt: Lay your dry, pre-washed shirt flat. You might want to place a piece of cardboard inside the shirt to prevent dye from bleeding through to the back.
- Position the Stencil: Place your heart stencil exactly where you want the design to be on the shirt. Secure it with painter's tape to keep it from shifting.
Applying the Dye with Precision
Instead of traditional squeeze bottles for this method, you might use sponge applicators or even spray bottles with very diluted dye. Apply the dye directly over the stencil opening. Be careful not to use too much liquid, as it can bleed under the stencil, which is pretty important.
For multi-color stenciled hearts, apply one color at a time, letting it dry slightly before adding another. This helps keep colors separate. Once the dye is applied, carefully remove the stencil. Let the shirt dry completely, then heat set the dye according to the dye manufacturer's instructions (often by ironing or tumbling in a dryer). This helps the color stay put, you know.
This method gives you a lot of control over the heart's appearance. You can even use fabric paint instead of dye for a more opaque look, if that suits your style better. It's a slightly different feel from the classic tie-dye, but still very much a custom creation, you know?
Care and Keeping of Your New Heart Shirt
Once your beautiful tie-dye heart shirt is complete, you'll want to keep it looking great for a long time. Proper care helps preserve those vibrant colors and the integrity of the fabric. It's a small effort that makes a big difference, honestly.
For the first few washes, wash your tie-dye shirt separately in cold water. This helps remove any excess dye that might still be present. After that, you can wash it with similar colors. Using a color-safe detergent can also help maintain brightness, so.
Avoid using bleach, as it will strip the colors from your shirt. Tumble drying on a low setting or air drying will also help prolong the life of your tie-dye. With a little care, your custom heart shirt will bring you joy for many wears, you know? It's like finding your way through a new city, you know, and once you get there, you want to keep that feeling of success. Speaking of which, sometimes getting a bit of direction from others, like a community sharing what they've learned, can really help you get the best outcome, almost like a live map for crafting, if that makes sense. You can learn more about crafting ideas on our site, and find more creative projects to try.
Common Questions About Tie-Dye Hearts
People often have questions when they're getting started with tie-dye, especially when trying to create a specific shape like a heart. Here are some common things people wonder about, you know?
How do you tie dye a heart?
To tie dye a heart, you typically fold your damp shirt in half lengthwise. Then, on one side of the fold, you draw half of a heart shape. You gather the fabric along this drawn line and bind it tightly with rubber bands or string. This creates a resist that keeps the heart shape clear when you apply the dye. It's a pretty straightforward method once you get the hang of it, actually.
What kind of string do you use for tie dye?
For tie dye, you can use various types of string or even just rubber bands. Cotton string or kite string works really well because it's strong and holds the fabric tightly. Some people prefer dental floss because it's thin and can create very fine lines. The key is to use something that can be tied very securely to compress the fabric, so.
How do you get a perfect heart tie dye?
Getting a perfect heart tie dye comes down to a few things. First, draw your half-heart shape carefully and make sure it's symmetrical when folded. Second, bind the fabric along that line as tightly as possible; the tighter the bind, the less dye will bleed. Lastly, don't oversaturate the fabric with dye, especially near the bound lines, which can cause bleeding. Practice helps a lot, too, you know?

Detail Author:
- Name : Elian Bayer DDS
- Username : greynolds
- Email : mterry@goldner.com
- Birthdate : 2001-03-27
- Address : 119 Darwin Falls Trinityville, PA 56519-1867
- Phone : +1.901.571.1805
- Company : Hagenes and Sons
- Job : Postsecondary Teacher
- Bio : Eum hic odit qui incidunt laudantium. Ut est quis tempore earum veritatis magni saepe omnis. Vel aspernatur odio quod et voluptatum dicta. Ut voluptatem accusantium sint non consequuntur et quo.
Socials
linkedin:
- url : https://linkedin.com/in/trinity_real
- username : trinity_real
- bio : Ea beatae quo non voluptas.
- followers : 2735
- following : 901
facebook:
- url : https://facebook.com/trinity.roob
- username : trinity.roob
- bio : Explicabo rem culpa fuga laboriosam.
- followers : 2326
- following : 2408
tiktok:
- url : https://tiktok.com/@troob
- username : troob
- bio : Delectus voluptas officia enim est et quia. Illo pariatur quis explicabo enim.
- followers : 2463
- following : 1928
twitter:
- url : https://twitter.com/roobt
- username : roobt
- bio : Voluptatem nemo debitis sed temporibus non quaerat alias. Nihil dolor aliquam doloremque omnis atque ut et.
- followers : 4083
- following : 538


 Bonus
Bonus