

There’s nothing quite like a beautifully put-together braid, is there? It just looks so stylish and feels so chic, truly. A nice braid, you know, does more than just keep your hair out of your face; it also adds a fun "twist" to your everyday appearance, making your look feel fresh and interesting.
Perhaps you have been searching for easy ways to braid your own hair, or maybe you are just starting out. Well, this is an easy to follow tutorial for braiding hair, and it also covers how to french braid and dutch braid, which is pretty neat. In this instructable, you'll learn how to braid your own hair for the first time, which is a big step, actually.
We will go over the basics of braiding, and then we will put in some practice, which is really important for getting the hang of it. Mastering the basics of braiding can give you the ability to create stunning looks that truly show off your creativity and personal style, which is rather cool. So, pull up to your mirror, and let's get right to it!
Table of Contents
- What is Braiding?
- Why Learn to Braid Your Own Hair?
- Getting Ready to Braid
- The Classic Three-Strand Braid
- Moving to French Braids
- Trying the Dutch Braid
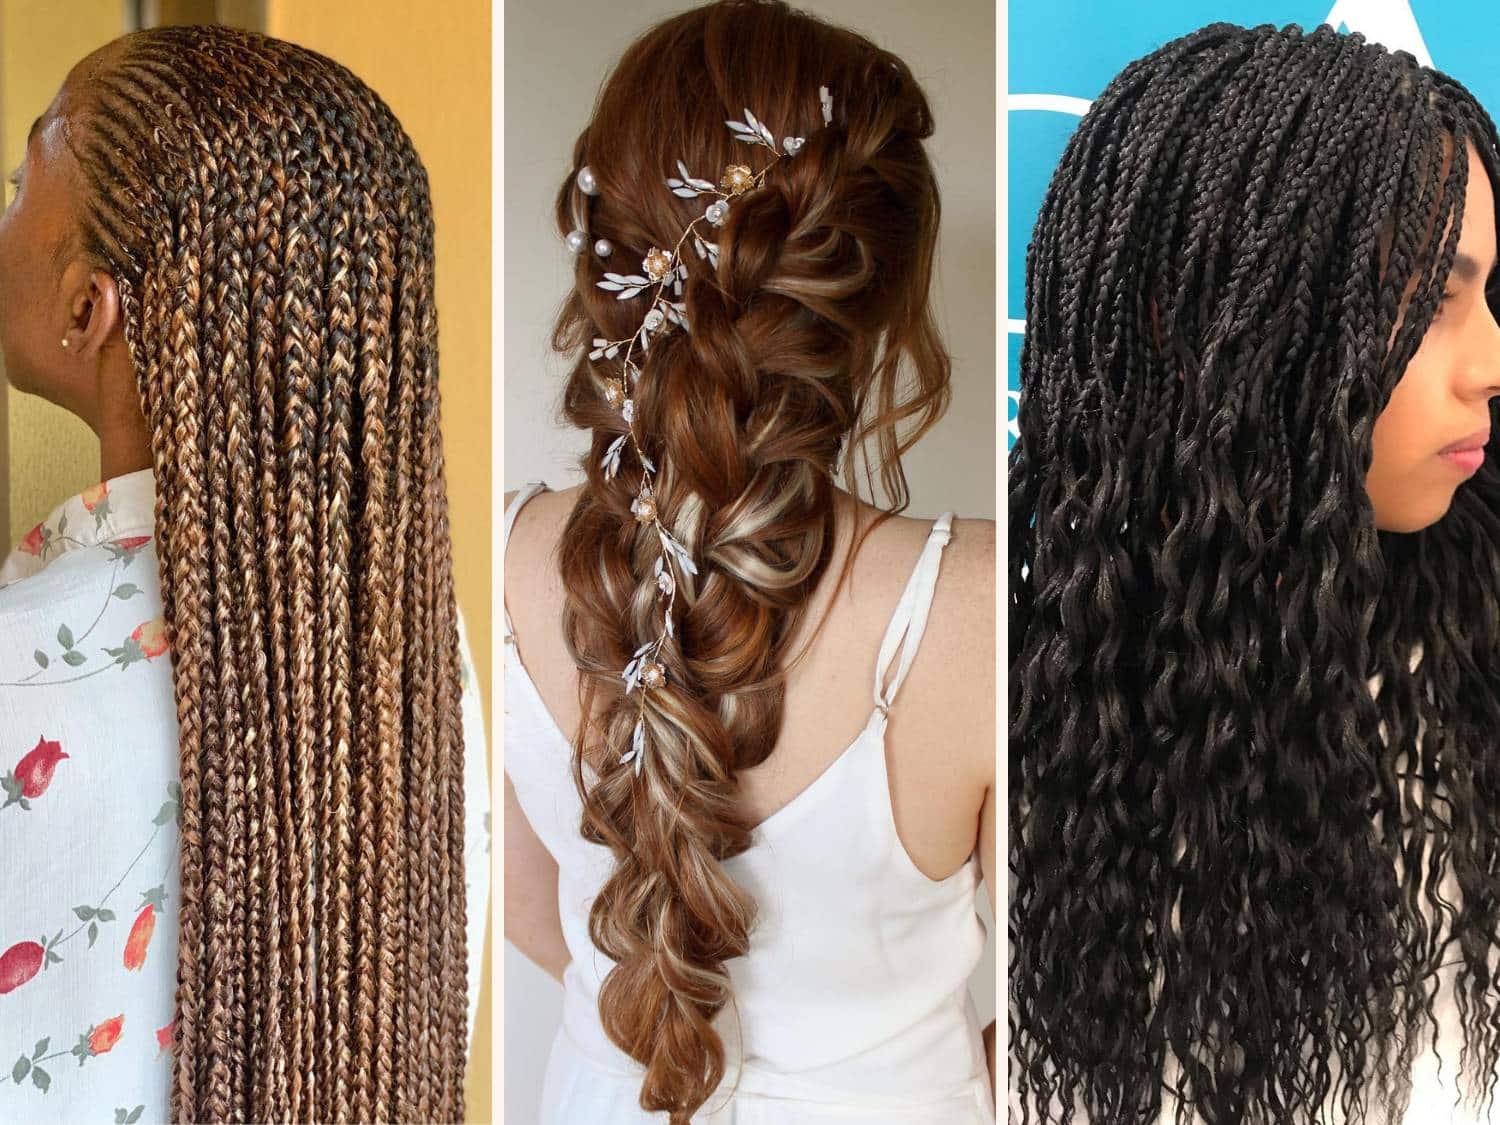
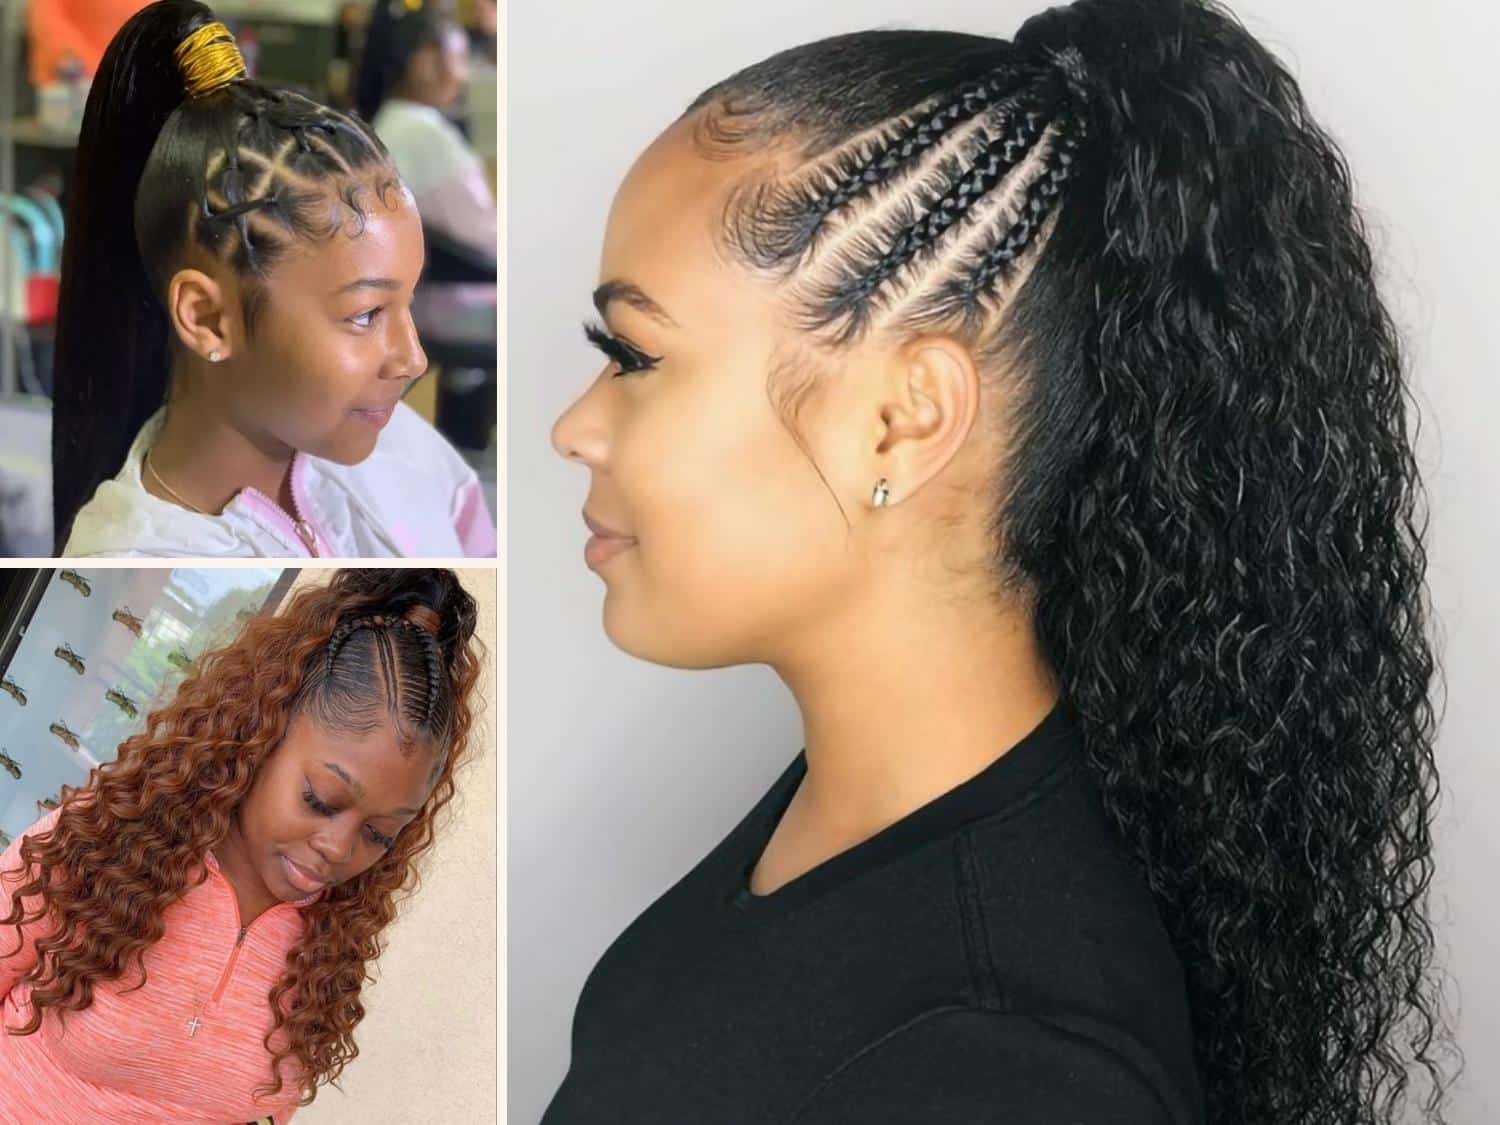
- Other Fun Braid Styles to Explore
- Keeping Your Braids Looking Good
- Frequently Asked Questions About Braiding
What is Braiding?
Braiding is a simple weaving technique, you know, used for many things, from hair to ribbon to flowers, actually. When we talk about hair, it means taking separate sections of hair and crossing them over or under each other in a repeating pattern. This creates a single, unified strand that holds its shape, which is quite clever.
It's a very old practice, found in many cultures around the world, and it has been around for a very long time. The basic idea is always the same: taking individual pieces and making them into one strong, pretty piece, which is kind of cool, in a way.
Why Learn to Braid Your Own Hair?
Braiding your hair can be a huge timesaver, which is really helpful, while also creating a hairdo you can flaunt! It is true. A nice braid keeps your hair out of your face, which is practical, and it adds a fun "twist" to your everyday look, making things more interesting, too. Learning how to braid your own hair means you always have a quick, stylish option, no matter what, which is a real plus.
You can create stunning looks that show off your personal style, and that is a great feeling. Whether you are going for something casual or a bit more dressed up, braids are so versatile. They are also pretty kind to your hair, helping to protect it from daily wear and tear, which is a good thing, you know.
Getting Ready to Braid
Before you start, gather a few things. You will want a brush or comb to get rid of any tangles, which is very important. A spray bottle with water can help dampen the hair slightly if it is too slippery or flyaway, making it easier to work with, in some respects. Hair ties or elastic bands are also a must for securing your braid when you are done, obviously.
Make sure your hair is clean and dry, or just slightly damp, for the best results, actually. Some people find that hair that is a day old holds braids better than freshly washed hair, as it has a bit more grip. Find a comfortable spot in front of a mirror, which is key for seeing what you are doing, especially when you are learning, you know.
The Classic Three-Strand Braid
This is the very foundation of all braiding, truly. Once you get this down, many other styles become much simpler to understand, which is rather nice. It is where everyone starts, and for good reason, as it teaches you the basic hand movements.
Step-by-Step Guide
Brush Your Hair: First things first, get all the knots out of your hair. Smooth hair is much easier to work with, you know. Make sure it is completely untangled from roots to ends.
Section Your Hair: Take a section of hair where you want your braid to start. For a simple braid, this might be all your hair gathered at the back, or a smaller section from the side. Divide this section into three equal parts, which is quite important.
Name Your Strands: To make it easier, think of them as Left, Middle, and Right strands. This helps keep track of where each piece goes, you know.
Cross the Left Over Middle: Take the Left strand and cross it over the Middle strand. The Left strand now becomes the new Middle strand, and the old Middle strand is now the new Left, which is a bit of a switch.
Cross the Right Over Middle: Now, take the Right strand and cross it over the new Middle strand (which was originally the Left). The Right strand becomes the new Middle, and the old Middle is now the new Right, as a matter of fact.
Repeat: Keep repeating these two steps: Left over Middle, then Right over Middle. Do this all the way down the length of your hair, keeping an even tension, which is key for a neat look.
Secure Your Braid: When you reach the end of the hair, or as far as you want the braid to go, use a hair tie to hold it in place. Make sure it is snug so the braid does not come undone, you know.
Tips for Beginners
Practice on Damp Hair: Slightly damp hair can be less slippery than very dry hair, which makes it easier to grip, especially when you are just starting out. This really helps, honestly.
Use a Mirror: Pull up to your mirror and let's get to it. Seeing what you are doing is very helpful, particularly for the back of your head, you know.
Start Loose, Then Tighten: Don't try to make it perfect right away. Start with a looser braid to get the motion down, then gradually work on keeping an even tension for a tighter, neater look, which is pretty much how everyone learns.
Practice on Others First: If you can, try braiding a friend's hair or even a doll's hair first. This lets you see the process more clearly before trying it on yourself, which is a good idea, in a way.
Don't Give Up: Braiding takes practice. Your first few attempts might not look perfect, and that is totally fine. Keep trying, and you will get better, which is how it usually goes, right?
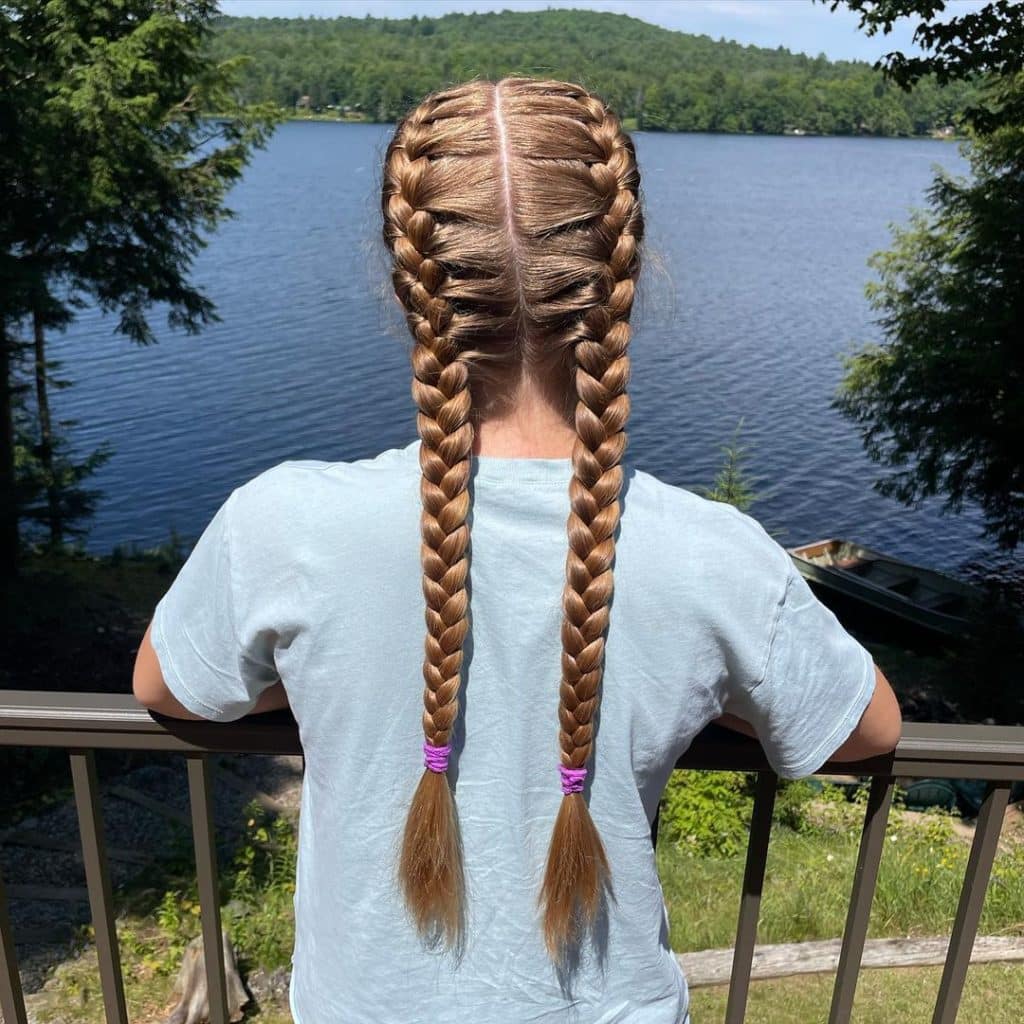
Moving to French Braids
The French braid is a classic and very elegant style, you know. It starts at the top of your head and gradually brings in more hair as you go down, creating a seamless look. It is a bit more involved than the basic three-strand braid, but it is totally doable with practice, honestly.
French Braid Steps
Start with a Top Section: Take a section of hair from the very top of your head, near your forehead. This will be the starting point of your braid, you know. Divide this section into three equal strands, just like you did for the classic braid.
Begin a Regular Braid: Make one or two crosses of a regular three-strand braid with these initial three sections. Cross the left strand over the middle, then the right strand over the middle. This gets your pattern going, basically.
Add Hair to the Left Strand: Before you cross the left strand over the middle again, pick up a small, new section of hair from the left side of your head. Add this new hair to your original left strand, combining them, which is the key step here.
Cross the Combined Left Over Middle: Now, cross this newly thickened left strand over the middle strand, just like before. This combined strand becomes the new middle, obviously.
Add Hair to the Right Strand: Similarly, before crossing the right strand, pick up a small, new section of hair from the right side of your head. Add this to your original right strand, making it thicker, too.
Cross the Combined Right Over Middle: Cross this newly thickened right strand over the middle strand. This combined strand becomes the new middle, and so on.
Continue Adding and Braiding: Keep repeating steps 3-6, adding small, equal sections of hair from each side as you braid down your head. Try to keep the sections even and the tension consistent, which is very important for a neat braid.
Finish with a Regular Braid: Once you have gathered all the hair from the sides of your head, continue with a regular three-strand braid down the remaining length of your hair. Secure it with a hair tie at the end, naturally.
Common French Braid Hurdles
Keeping Sections Even: It can be tricky to pick up equal amounts of hair each time. Practice helps a lot with this, honestly. Use your fingers to feel for the right amount, you know.
Arm Fatigue: Holding your arms up can get tiring, especially when braiding the back of your head. Take breaks if you need to, which is perfectly fine.
Loose Spots: If your braid looks lumpy, it is likely due to uneven tension. Try to keep a firm, consistent pull on each strand as you braid, which makes a big difference, you know.
Starting Point: The very beginning of the French braid can be the hardest part. Make sure your initial three strands are well-defined and held firmly, basically.
Trying the Dutch Braid
The Dutch braid is often called an "inside-out" French braid, which is a pretty good way to think about it. Instead of crossing strands over the middle, you cross them *under* the middle, which makes the braid stand out from your head, creating a raised, almost 3D effect. It looks really cool, actually.
Dutch Braid Steps
Prepare Your Hair: Just like with the French braid, start with a section of hair at the top of your head and divide it into three equal strands. Smooth out any tangles, you know.
Begin Underneath: This is where it differs. Take the left strand and cross it *under* the middle strand. The left strand is now the new middle, and the old middle is the new left, which is a key difference.
Cross Right Under Middle: Now, take the right strand and cross it *under* the new middle strand. The right strand becomes the new middle, and the old middle is the new right, you see.
Add Hair to Left Strand (Underneath): Before you cross the left strand under again, pick up a small, new section of hair from the left side of your head. Add this new hair to your original left strand, combining them, just like with the French braid, but remember the "under" part.
Cross Combined Left Under Middle: Cross this newly thickened left strand *under* the middle strand. This combined strand becomes the new middle, basically.
Add Hair to Right Strand (Underneath): Similarly, pick up a small, new section of hair from the right side of your head and add it to your original right strand.
Cross Combined Right Under Middle: Cross this newly thickened right strand *under* the middle strand. This combined strand becomes the new middle, and so on.
Continue and Secure: Keep repeating these steps, adding hair from the sides and crossing strands *under* the middle, until you have gathered all the hair. Finish with a regular three-strand braid (crossing under) down the remaining length and secure it with a hair tie, which is pretty much the same as the French braid finish.
Making it Look Great
Even Sections are Key: For a clean, prominent Dutch braid, try very hard to pick up consistent, small sections of hair to add. This helps the braid stand out evenly, which is really important.
Pull Apart Gently: Once your Dutch braid is finished and secured, you can gently tug on the outer loops of the braid to make it look fuller and wider. This is called "pancaking" and can give it a softer, more voluminous appearance, which is a nice trick, you know.
Use a Mirror for the Back: Again, a mirror is your best friend for seeing how the back of your head looks, especially when you are doing a single Dutch braid down the back, which can be a bit tricky to see.
Other Fun Braid Styles to Explore
Once you are comfortable with the classic, French, and Dutch braids, you will find that many other styles build on these foundations. For example, a fishtail braid, a rope braid, or even more complex styles like a halo braid or a braided bun. The possibilities are pretty much endless, actually!
You can try combining braids, like doing two Dutch braids on either side of your head, which is a popular look. Or you can use a small braid as an accent in a larger hairstyle. Keep scrolling for everything you need to know, plus eight of my favorite looks to try once you have the basics down, which is rather exciting.
How do you braid your own hair easily? It really comes down to practice and getting those finger movements to feel natural. You might find some styles easier to do on yourself than others, and that is totally okay. Just keep experimenting and have fun with it, you know.
Keeping Your Braids Looking Good
To keep your braids neat and tidy, a little hairspray can help tame any flyaways, which is useful. For sleeping, a silk pillowcase can reduce frizz and help your braid last longer, which is a good tip. If you want to refresh a braid, a little dry shampoo at the roots can add volume and absorb oil, making it look fresh again, apparently.
Braids can last for a day or two, sometimes even longer, which is part of why they are such a huge timesaver. They are a great way to protect your hair, especially if you are active or want to avoid heat styling for a bit. Learn more about hair care tips on our site, and link to this page for more braid inspiration, you know.
Frequently Asked Questions About Braiding
Can I get braids if my hair is short?
Yes, you certainly can get braids even with shorter hair, which is pretty cool. It might be a bit more challenging to hold onto the strands, especially for very short layers, but a skilled braider or a bit of practice can make it happen. You might start with smaller sections or focus on styles like mini braids near the hairline, which can look very charming, actually.
How do I make my braids stay in longer?
To help your braids last longer, there are a few things you can try, honestly. Making sure your hair is clean but not too slippery (sometimes day-old hair works best) is a good start. Using a strong, small elastic at the end helps secure it well. You can also use a light-hold hairspray to keep flyaways down. Sleeping on a silk pillowcase can reduce friction and keep your braid looking neat for an extra day or so, which is a handy trick, you know.
What is the easiest braid for beginners?
For someone just starting out, the classic three-strand braid is definitely the easiest to learn, you know. It teaches you the basic hand movements and how to manage three sections of hair. Once you feel comfortable with that, moving on to the French or Dutch braid becomes much simpler, as they build on those core skills. Just keep practicing that basic pattern, and you will get the hang of it, basically.
Keep scrolling for everything you need to know, plus eight of my favorite looks to try, once you have these foundational skills down. You can find more helpful hair styling guides on reputable beauty sites, like Cosmopolitan's braiding section, for even more ideas and tips. Remember, practice really does make perfect when it comes to braiding your own hair.
Detail Author:
- Name : Madeline Ritchie MD
- Username : harmon.christiansen
- Email : fritsch.isabel@gmail.com
- Birthdate : 1982-05-08
- Address : 403 Jacky Summit Apt. 586 Hughview, AK 61365-6875
- Phone : 878.332.9998
- Company : Vandervort LLC
- Job : Forensic Investigator
- Bio : Illum tempore accusantium similique ut quaerat accusamus. Dolorem et voluptas quia aspernatur. Dolorem quia repellendus iste ipsa est totam. Porro dolorem vel reprehenderit veritatis rerum.
Socials
tiktok:
- url : https://tiktok.com/@ana_hegmann
- username : ana_hegmann
- bio : Culpa iste quia qui eveniet vel. Reprehenderit vitae doloribus quas laborum.
- followers : 2815
- following : 1618
twitter:
- url : https://twitter.com/ana_dev
- username : ana_dev
- bio : Natus assumenda non necessitatibus libero. Molestias temporibus consequuntur consequatur rem.
- followers : 4432
- following : 478
instagram:
- url : https://instagram.com/ana_hegmann
- username : ana_hegmann
- bio : Nobis ipsam eos id non officiis iure. Est ad porro illum incidunt sed est.
- followers : 1862
- following : 2869
linkedin:
- url : https://linkedin.com/in/hegmanna
- username : hegmanna
- bio : Aspernatur amet quis incidunt magni odit quia.
- followers : 6915
- following : 1908


 Bonus
Bonus